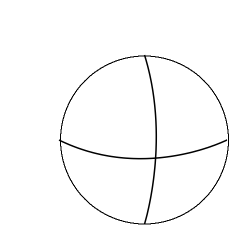
Stage 1 : Guidelines
|
|
- Begin with a new image, white background, 500x500 pixel size
- Create a new layer "Guidelines"
- Create a circular selection using the ellipse select and
holding shift
- Drag/drop black colour into selection
- Select->Shrink. Choose 2 pixel. Clear region.
- Using the "Create and Edit Paths" tool, create each curve
as shown by drawing the curve, then stroking the path
- This image serves as guidelines: the circle is the shape of
the head, while the curves guide the drawing of the face, where the
intersection is the nose location.
|
Stage 2 : Sketch
|
|
- Create a new layer "Sketch"
- Using the guidelines, draw out your cartoon using the
pencil. Do not worry if it is messy, this will be handled in the next
step.
|
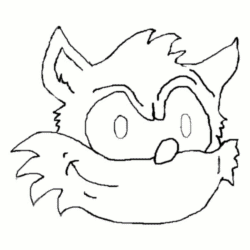
Stage 3 : Brezier curved outline
|
|
- Create a new layer "Outline"
- Hide the Guidelines layer
- Using the path selection tool, draw on the Outline layer
using the Sketch as a guide.
- Create the clean looking curves by using the "stroke path"
option. Make sure to turn antialiasing off at this point, and make sure
the lines are the width you'd like them to be in the final drawing.
Unless you are very talented with curves, you should path->stroke
path each curve individually instead of setting up many points in the
path.
- Using the zoom tool and the pencil/eraser, fill in any
breaks in the outline and erase any lines which extend too long.
|
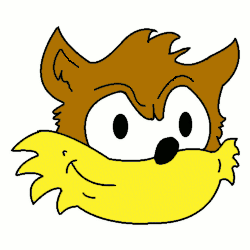
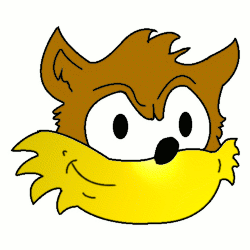
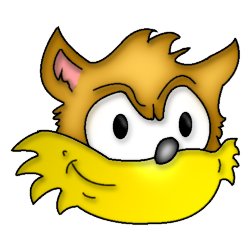
Stage 4 : Colouring
|
|
- Using the "select contiguous regions" tool (aka magic
wand), select a region inside the outline which you would like to colour
- Create a new layer with the name of the region you've
selected. In that layer, making sure that the area you selected before
is still selected, drag the colour you would like to use into that
selection.
- Select the Outline layer again, and repeat this step until
you have a colour layer for each area you want coloured. In this
picture, the layers: Mouth, Hair, Eyes, Iris, and Nose were made.
|
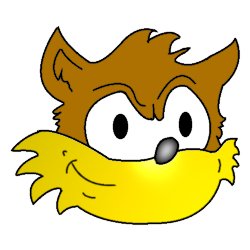
Stage 5 : Light effects on mouth
|
|
- Select the colour layer you would like to add some shading
to. In this example, the Mouth layer has been chosen
- Using the Filters -> Light Effects -> Lighting
Effects filter, place a point source light around the nose area and
adjust the lighting options to your liking. Apply.
|
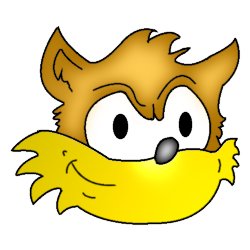
Stage 6 : Glowing nose
|
|
- Create a new layer "gNose" (short for glow nose) above the
Nose layer.
- Using a white pencil, draw a some white over the nose where
you would like it to shine the most. In this example, the white has
been drawn in the center of the nose.
- Using Filters -> Blur -> Gaussian Blur (IIR), blur
this layer by 15 to 40 pixels.
- Go back to the Nose layer, and select the region outside
the nose.
- From gNose, clear the selection.
|
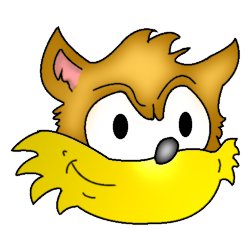
Stage 7 : Shiny hair
|
|
- From Hair, select the entire coloured region.
- Select -> Shrink by around 12 pixels
- Create a new layer "gHair"
- Drag a slightly lighter shade of the colour used for Hair
into this selection in gHair
- Apply a 40 pixel Gaussian blur.
- Select the area outside the colour in Hair, go back to
gHair and clear this area.
|
Stage 8 : Inner ear
|
|
- From Outline, draw a tiny line to close off the gap in the
inner ear with the colour for the inner ear.
- Select the region for the inner ear which you just closed
off
- Create a new layer "Ear"
- Drag your inner ear colour into the selection in Ear.
- Using the "Dodge or Burn Strokes" tool, darken the areas
which you would like shaded.
- Use the Smudge tool and the Blur tool to soften the shading.
- Go back to the Outline, and use the "Select regions by
colour" tool to select and clear the line you added at the beggining of
this stage.
|
Stage 9 : Drop shadow shading
|
|
- Choose the Outline layer
- Use Script Fu -> Shadow -> Drop Shadow. Play with the
default settings to get the shadow looking how you want it.
- The shadow can be moved after it has been made by selecting
all in the newly made drop shadow layer and moving the shadow by hand
until it lines up to give a good illusion of depth.
- Select the region outside the outline in the Outline layer.
Go back to the drop shadow layer and clear this region.
- The shading on the eyes is added using a similar method to
shading the nose, where there is a little light gray added to the top
right of the pupils on another layer, which is blurred.
- Show off your new cartoon to all of your friends.
|
